DIY Headlamp holder with nylon/paracord

Along the same lines as my DIY concealed belt, I realized that I don’t carry a headlamp with me all the time, but I have come across situations in which a headlamp would have come in useful. Since I already carry nylon cord and a flashlight, I made some DIY headlamp holder plans to help me out in those situations!

Along the same lines as my DIY concealed belt, I realized that I don’t carry a headlamp with me all the time, but I have come across situations in which a headlamp would have come in useful. Since I already carry nylon cord and a flashlight, I made some DIY headlamp holder plans to help me out in those situations!

1) Take a length of nylon cord / paracord (Of course, longer than the size of your head).

2) On one end, tie a bowline knot.

* In the next step, you will have to tie a loop whose name I have completely forgotten (If you know it, please let me know its name!). It is very similar to the Alpine butterfly, but with one less loop. Here’s a picture demonstrating how to tie it:


a) Loop the string 3 times around your fingers
b) Take the 3rd (right) loop and bring it across to the 1st loop…
c) …and push it under the 2 loops
d) Holding the loop, take the string off your fingers and tighten it

3) Just after the bowline knot, tie two of the above knots consecutively. Your string should now look like this:

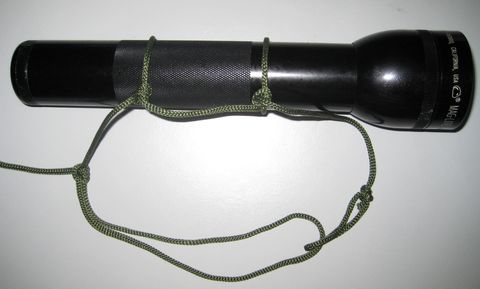
4) Take the two loops, and place them around your flashlight, then pull them TIGHT.

5) Take the other untied end of the string, pull it through the bowline loop, and tie a taut-line hitch.

6) You’re done! Place the entire contraption over your head, and slide the taut-line hitch back and forth to adjust the size of the head lamp band. By adjusting the position of the 2 loops, you can, to some extent, change the angle at which the flashlight points. Don’t overdo it though – you may risk having your flashlight fall out from the loops! Additionally, you could probably make 2 more loops on the other side and mount a 2nd flashlight!

Here’s a picture of a CD/DVD container wearing a headlamp (This is my 4Sevens Quark AA flashlight):

And with a smaller flashlight (My Liteflux LF2XT):

I find that smaller flashlights tend to work better as they are lighter. However, there’s no rule against big flashlights! So, how’s a heavily modified Maglite 2D look as a “headlamp”?

Granted, my head started to tilt to one side with that huge behemoth attached!

Now, I don’t consider this to be a permanent solution for a headlamp – a real headlamp which is on the front of the head is still better, and can be angled up and down much more easily. However, if you ever happen to have only a hand-held flashlight and some cord, hopefully this guide comes in useful!

EDC while exercising – DIY concealed belt

If you have read my post on things I carry every day (EDC), you may be left wondering what I carry when I go exercising. Recently, I came up with a solution to carry my basic, essential items while jogging, without looking weird or weighing down my pockets.

If you have read my post on things I carry every day (EDC), you may be left wondering what I carry when I go exercising. Recently, I came up with a solution to carry my basic, essential items while jogging, without looking weird or weighing down my pockets.

I decided to make use of a length of string and some well known knots to make my own adjustable belt which I wear when I exercise, on which I can hang a number of items. In fact, after I made it, I found that it doesn’t bother me at all, and so I never take off my “belt” – I even wear it to sleep! (Of course, I do take off a couple items) So, I have decided to share this creation here!

1) Take a length of string. Preferably, you should use paracord, but any type of relatively durable/thick nylon cord should work. The length of the string depends on how many ‘hanging loops’ you want, but of course needs to be fairly longer than the circumference of your waist.

2) On one end, tie a bowline, double bowline, or figure-8 loop. In this example, I used a bowline because it’s a relatively simple and reliable knot, and I haven’t had issues with it.

3) Using the Alpine Butterfly knot, fashion as many loops as you want, in whatever positions you want them in. In this example, I made 4 loops, 2 for the left side of the waist, 2 for the right side.

4) Take the other (untied) end of the string, and pass it through the loop you made in step 2. You may want to wear your belt now to adjust the length as needed.

5) Tie a taut-line hitch. You can slide this knot back and forth to adjust the size of the belt to suit your waist. In my example, I used a slight variation (#1856) of the taut-line hitch, which is slightly less secure but easier to adjust.

Your belt is completed! Now, go ahead and hang items on it:

On my belt, I chose to hang the following items:

1) A small plastic namecard holder which holds my Malaysian National ID card, driving license, and some spare cash.
2) Swiss army knife
3) Whistle
4) Small flashlight

You can easily modify your belt to your needs! It’s simple, cheap and easy to make!

Now, when I go jogging, I don’t have to bother keeping my wallet with me because I have my ID & driving license. In addition, the spare cash can come in useful if needed.