FreeNAS: Simultaneous AFP/CIFS shares done neatly

Learn how to hide Mac OS specific files from being displayed to a Windows client when using simultaneous AFP and Samba/CIFS shares.

In many networks these days, you’ll probably have more than just Windows or Mac OS clients. If you regularly exchange data between Mac OS and Windows/Linux using a flash drive and have hidden files enabled, you may notice a bunch of .DS_Store folders and other various files beginning with a dot. Personally, I find it somewhat annoying that Mac OS litters whole file systems with these files (In the same way, I also hate those thumbs.db files Windows generates)

In a unified file server which serves multiple operating systems, we ideally want each client to have a good experience browsing for files. We don’t want Windows users to be bogged down in a mess of files they have no clue about, and we don’t want them accidentally deleting files which may be important to the Mac OS experience.

There are no adjustments which need to be made on your AFP shares, since only Mac OS clients access those shares and know what to do with these files. However, these files should be hidden on CIFS shares. Here’s how you do it in FreeNAS 8 (The solution applies to anyone using CIFS, not just in FreeNAS):

1. Navigate to your CIFS share and press edit

2. Find “Auxilary Parameters at the bottom”

3. Enter the following text in the box

veto files = /Temporary Items/.DS_Store/.AppleDB/.TemporaryItems/.AppleDouble/.bin/.AppleDesktop/Network Trash Folder/.Spotlight/.Trashes/.fseventd/
delete veto files = yes
hide dot files = yes

Vetoing a file will render it completely invisible to anyone accessing the share. It differs from hidden files in that hidden files are hidden on the client side, but vetoed files are hidden on the server side even before the list of files is sent to the client.

The first line veto files specifies a list of file names to veto, each entry separated by a ‘/’, and you can also use wildcards (‘*’ and ‘?’) to specify multiple files with a single pattern.

delete veto files” allows CIFS to delete any vetoed files within a directory when that said directory is deleted. If this is not set to ‘yes’, deleting a directory could fail.

hide dot files” is optional, but simply sets all files beginning with a dot (which are hidden files in Mac OS and Linux) with a hidden flag.

4. Restart CIFS from your Services tab

If all is well, browsing your shares from all computers should now be a pleasant experience!

If you’re ever in doubt, or if you want to find out what other options can be entered, do check out the smb.conf documentation.
Observing With NASA: Remotely controlled telescopes which YOU can use!

There is no doubt that the sky is an amazing piece of art. When you look up at the sky in a clear and dark location, the sight of hundreds of stars can literally take one’s breath away. What’s amazing is that in the spaces between the stars and planets lurk more things than you can imagine – nebulae, galaxies, even more stars, and who knows what else which has yet to be discovered!

Have you ever wanted to use a telescope or take photos of celestial objects, but never had access to one? Find out more about Harvard’s Observing With Nasa (OWN), a website which allows you access to remotely controlled robotic telescopes, and see what kind of photos you can produce!

Introduction

(You can skip this section if you’re impatient, although it must be said that [amateur] astronomy is generally not for the impatient!)

There is no doubt that the sky is an amazing piece of art. When you look up at the sky in a clear and dark location, the sight of hundreds of stars can literally take one’s breath away. What’s amazing is that in the spaces between the stars and planets lurk more things than you can imagine – nebulae, galaxies, even more stars, and who knows what else which has yet to be discovered! Of course, this is when you should break out the telescope, but alas, most people have many obstacles to deal with. Things such as city light glare, bad weather, lack of a telescope, lack of knowledge regarding the skies, and lack of time are just a small part of a long list. However, if you have ever had the chance to look through a telescope at the majestic Jupiter or Orion Nebula (to name two out of millions!), you will no doubt want to share the exciting sights with your friends.

Recently, I became interested with all things up in the heavens, and took a course in Celestial Navigation. It was here that I got my first sights through a good telescope, and spent a great many long nights enduring the cold nights and waiting for the right moment to catch a glimpse of star clusters, planets, and galaxies. While I wish my friends would have the same opportunity, I know that not everyone will have access to a nice telescope, nor have the time nor effort to spend.

Observing with NASA (OWN)

Without further ado, here’s the link: http://mo-www.harvard.edu/OWN/

Thanks to some people (including my professor who taught me Celestial Navigation) who realized that telescopes were not something easily accessible to most people, they set up a number of remotely controlled robotic telescopes which can be controlled over the internet. Now, anyone who has an email address can submit a request online so that one of the telescopes will snap a photo of a celestial object (the list of available objects are predefined)

Thus, if you wanted to observe Jupiter, you could simply submit in a request for Jupiter, and your photo will be taken! It’s a great start in learning how telescopes work and in observing the sky. Of course, the results may not be what you expect–for instance, there may have been a cloudy sky when the telescope took your photo. Or more likely, you’d be disappointed with the results which don’t look like those you see on NASA’s websites.

Now, you could simply live with those results, or you could go on and learn a bit of image processing. The difference between an unprocessed image and a processed one is massive, although it does require quite a bit of work!

Here’s an example of what a single unprocessed* image from the telescope may look like:


*Even this image is not completely ‘unprocessed’–its levels have been adjusted appropriately

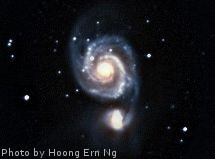
Doesn’t look too good, does it? (Actually, I find that even unprocessed, the photo is amazing–since you’re looking at a whole other galaxy, TWO in fact!) However, with perseverance, you can stack multiple images on top of one another, and do a bit more processing. To me, this is a very rewarding experience–taking something which was invisible in the sky and seeing its beauty. Here’s the same object after processing:


Whirlpool Galaxy (M51a), two interacting galaxies

Of course, don’t expect it to compare to a photo taken by NASA using the Hubble telescope!

(Link to full photo hosted on Wikipedia. WARNING: VERY LARGE PHOTO – 71MB in size!!!)

The point is–you can take and create your OWN photos! So, if you’re someone who’s always wanted to take some photos of celestial objects in the sky but never had the chance to do so, here’s your opportunity! So enjoy, and may you discover wonderful things in the sky above!

Some of my photos

Here are some of the photos I’ve processed using OWN, in addition to the Whirlpool galaxy shown above. Keep in mind that many of these are the result of many photos taken over a whole month!

Andromeda Galaxy (M31), our closest galactic neighbor:

Sculptor Galaxy (NGC253), also known as the “silver coin”

The Sun, the nearest star. Of interest are the black sunspots.