My goal for this project was to create a brake light system for my bike which did not require anything more than minor adjustments to the existing bike – I did not want to have to drill holes or change parts. In addition, as I use my flashlights for other activities other than biking, I wanted to be able to easily switch out my flashlights for some other use, or to a different bike.
My goal for this project was to create a brake light system for my bike which did not require anything more than minor adjustments to the existing bike – I did not want to have to drill holes or change parts. In addition, as I use my flashlights for other activities other than biking, I wanted to be able to easily switch out my flashlights for some other use, or to a different bike.
Here’s the parts I used:
Solarforce PTS-3 pressure tape switch and tailcap
2x Solarforce L2P P60/D26 modular flashlight
1x Nailbender (Customlites) P60 drop-in: 2.8V-6V Red XPE2, OP reflector, single mode (high)
1x Nailbender (Customlites) P60 drop-in: 2.8V-6V Red XPE2, OP reflector, 5 mode (low/med/high/strobe/SOS)
2x Diffuser lens (to widen viewing angle)
2x Twofish LockBlock flashlight mount
Topeak bar extender
Some standard copper 18AWG multi-core wire
Standard tools: soldering iron, solder, zip ties, heatshrink tube
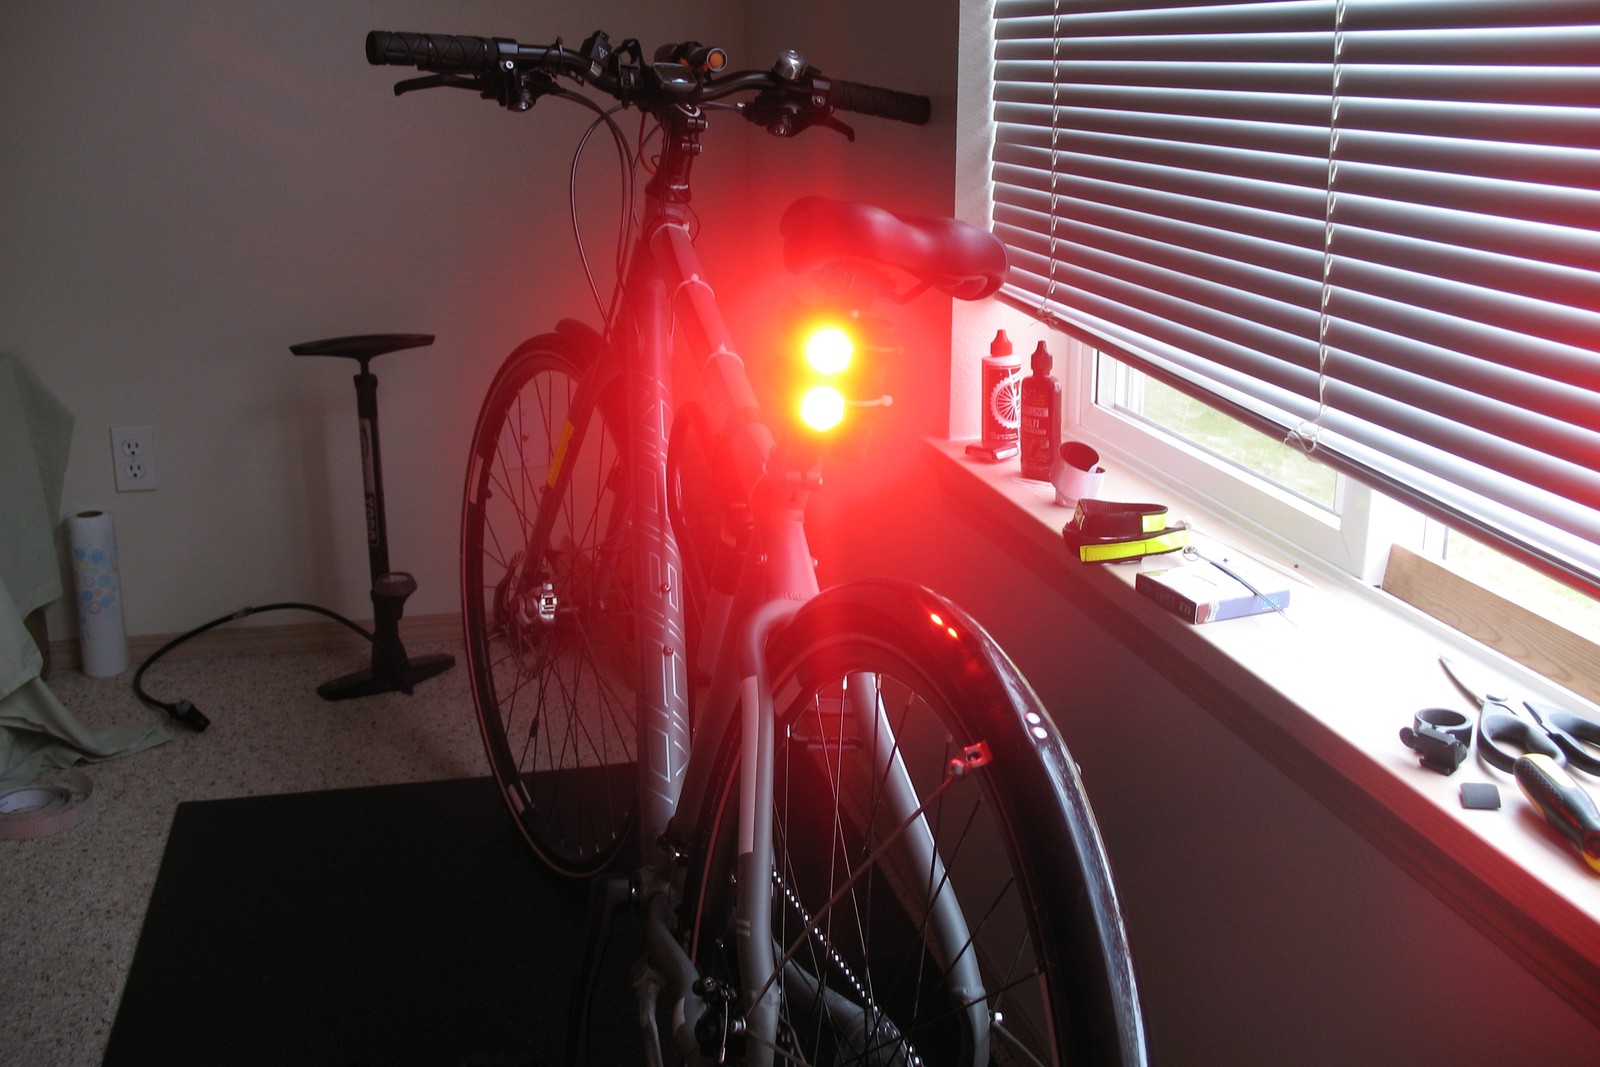
I already had most of the parts before even considering this project, except for the drop-ins and pressure switch. Here is the result, with both lights turned on in high mode.
As you can see, I have wires running along the frame of the bike and soldered to the PTS-3 which I cut in half and extended. At this end is the tail cap connector
At the handlebar end is the tape switch, which I have zip-tied, but could easily glue on. At least with my riding style, my thumb is near the tape and I can easily press it when braking with my other fingers.
I considered modding the actual brake lever to toggle a switch, but decided against for a couple of reasons:
It sounded too complicated for my liking, and again I wanted to avoid modding the actual bike
I might change my brake levers, which would require a whole rework
There are times when I only use my rear brake (the right lever) but would still want the light to toggle on.
I will admit that having the switch there makes it awkward at times as gripping the handlebar turns on the flashlight, but as most of my riding is done in the city with my fingers always over the brake lever ready to stop, it’s not a huge deal. For others, of course, this solution may not work.
In my estimates, on high mode, the lights are probably putting out about 300 lumens each. They work great for daytime visibility, but at night, I definitely have to turn it down to medium (I also have a slightly blackened diffuser lens to lower output), if not, it’s extremely blinding for drivers. I also avoid strobe/flashing modes at night as I believe it just makes it more difficult for drivers to judge distance.
Yesterday (November 12, 2012) I revisited Gunung Datuk with a few of my old high school (SMK Taman SEA) friends.
I’ve updated my first post on Gunung Datuk with new photographs and information, so you should head there if you’re interested in photos and information.
DISCLAIMER: This post was made in 2012. Information may be out of date!
I revisited Gunung Datuk on November 12, 2012 with a few of my old high school (SMK Taman SEA) friends.
I’ve updated my first post on Gunung Datuk with some new photographs and information, so you should head there if you want details on the climb.
It was a slightly different experience as it has been raining a lot, so the trail was quite wet and the stream at the start of the trail was about 12″/30cm higher than on my first climb (Doesn’t matter in terms of crossing as there’s a bridge). Luckily, we had much better skies this round, meaning that we got a pretty good view at the [false, I should say] summit.
All in all, a nice morning out, though I’m not sure I would normally drive almost 2 hours each way from PJ for such a short climb, especially with 10 people crammed into 2 cars!
My 2nd visit to Bukit Kutu. This post is more of an addition to my first post on Bukit Kutu, to provide more thorough information on the Bukit Kutu climbing experience.
DISCLAIMER: This post was written in 2012. Information may be out of date!
Location: Kuala Kubu Bharu, Selangor, Malaysia. Start point: 3.572510N, 101.738128E 289m a.s.l. Summit: 3.543263N, 101.719998E 1092m a.s.l. Difficulty: Moderate. No technical skills required, just a fair amount of stamina. The trail is not very steep, but it goes on for a fair amount of distance. Trail is easy to follow but has a fair number of obstacles (branches, fallen trees, etc.)
Date climbed: Fri 26 Oct 2012
This post is more of an addition to my first post on Bukit Kutu, to provide more thorough information on the Bukit Kutu climbing experience. I decided to revisit Bukit Kutu for a few reasons – a few of my friends wanted to climb it, I wanted to collect a bit more detailed information on the trail for a future climb, and also for the purpose of training (I decided to carry a 12kg backpack up).
Duration: 3 hours 57 minutes (including break at summit & ruins)
Length: 6.5km
Average Speed: 1.6km/h
Max elevation: 1092m
Min elevation: 285m
Vertical Up: 992m
Vertical Down: 216m
Times given are for a 3 hour ascent time.
Driving to Bukit Kutu
Assuming you know how to reach Kuala Kubu Bharu (either via Bukit Beruntung, my preferred choice, or Rawang, which is slightly cheaper), keep driving towards Fraser’s Hill. Soon the Sungai Selangor dam will be in sight. A few minutes after passing by a small rest area, turn right into Kampung Pertak. On reaching a small T-junction, turn right. Continue all the way until the road becomes a gravel road, and eventually you’ll reach the 1st bridge. There is some amount of space to park around here, though probably not for more than 5 cars (If not you’ll have to park further back along the road and walk further).
At this point, one can also go down to the river, which is also a great spot to freshen up once you return from climbing Bukit Kutu.
The bridge crosses over a small stream. The stream can also be crossed without the bridge to the left, where offroad vehicles should also be able to cross, if needed (about ankle deep).
After crossing, follow the fairly wide path for a few minutes. (There are some good views of the river along the path)
River view
2. [00:07, 0.5km, 300m] Bridge #2 (Broken)
This second river is a bit wider and deeper than the first. The bridge has also been broken for quite a long time, but it’s still fairly easy to cross.
3. [00:11, 0.6km, 306m] Junction #1
Keep right. Going left will eventually lead to 2 waterfalls via a 3hr hike.
4. [00:14, 0.8km, 325m] Junction #2
Keep right. The trail will start to narrow after this.
5. [00:18, 1.1km, 311m] River crossing
Photo taken from 1st climb in August, with lower water levels
This is the one major river crossing you’ll have to make. On average, it is just below knee depth, probably between 1-2 feet deep. On my 1st trip, water was completely clear and not that deep. On this 2nd trip, water was about 8″/20cm higher and very slightly cloudy, just over knee deep. Removal of footwear is necessary.
BEWARE: This river can rise to fairly deep levels (estimated chest deep by checking erosion levels) and fairly strong currents, if there is heavy rainfall. When crossing, always face upstream and be aware of any changes in levels especially if it looks like it may be raining upstream. Don’t cross if water level is approaching waist depth or water is turning murky. Always be prepared to wait for levels to recede, it’s not worth risking your life.
6. [00:27, 1.1km, 320m] Stream #1
Comes almost immediately after the river crossing. About 2-4in deep. Unless river levels are high, doesn’t require removal of footwear. On both occasions we got across without removal of footwear.
7. [00:33, 1.2km, 344m] Junction #3
Keep right.
8. [00:37, 1.4km, 333m] Stream #2
Similar to stream #1, about 2-4in deep, and can be crossed easily enough.
9. [00:43, 1.6km 324m] Stream #3
Similar to stream #1, about 2-4in deep, and can be crossed easily enough.
After these junctions and river/stream crossings, the rest of the climb is straightforward. There are a few various paths, but they mostly lead back to the same place. Just watch out for the trail markers or “do-not-cross” markings.
10. [01:00, 2.4km, 419m] Tree shelter
Photo taken from 1st climb in August
A fairly recognizable checkpoint – a tree with a massive root system across the path. After this tree, the trail stars to climb a bit more steeply.
11. [01:06, 2.5km, 460m] Clearing
One of the few open places along the trail. Probably one of the few places you could camp if necessary.
12. [01:28, 3km, 602m] “Keep right” before CP4
Optional and obvious, as the left path rejoins the trail, but consists of a very steep climb. If you’re adventurous, you can go left. Otherwise, one would naturally take the easier right path.
13. [01:33, 3.2km, 643m] Checkpoint 4, water point
Photo taken from 1st climb in August
The only water point along the way to the summit. Don’t drink without treatment.
14. [01:36, 3.3km, 666m] “Turn left, go up”
Fairly obvious. If I remember, there’s a tape across the right path preventing people from going the wrong way. If in doubt, the left trail has trail markers (ribbons tied to the trees)
15. [01:40, 3.4km, 670m] “Keep left while descending”
I’m fairly sure that the right path rejoins the main trail, but there was an “X” marked by sticks across the right trail (as seen when descending). Clear in the daytime, but may be missed in darkness.
(My GPS signal went a bit wonky here due to the huge boulder) This checkpoint can’t be missed. Take a good break here and snap some photos. Be aware that there are some sweat bees around which may take a liking to your perspiration, but as long as you don’t squash/swat them, they won’t sting you.
The section of trail for 10 minutes after CP5 is fairly slippery, so take care. There is a small cord tied there to assist, but don’t put your full weight on it. Instead, try to find the best places to put your feet and only rely on the rope for extra stability.
Also, between CP5 and the summit, there are a few sections which require squatting down to pass under fallen bamboo. Be prepared to get your hands muddy if the ground is muddy!
17. [02:44, 5.5km, 926m] “Turn left and go up”
There was tape across the right path. Fairly clear.
18. [03:05, 6.1km, 1074m] Broken house
Just before the broken house (when you can see the chimney), when you emerge from the jungle, there’s an intersection where a well is placed. Turning left goes towards the house. Going straight goes on towards the summit.
Note: The broken house area has a few exits! I’m not sure where they go, so remember to take the exit which passes by the well.
19. [03:09, 6.1km, 1092m] Summit
After climbing up a few paths with wooden branch handrails, there are a series of ladders which reach the viewing point, which is the summit. Beware of a potential wasps nest on the first rock, on which the 1st ladder rests. There are a few holes in the rocks which used to hold a wasps nest. (It was active on my first climb, though I didn’t see any wasps there on my 2nd climb) Remember the rule of ONE person on a ladder at a time. You can probably only fit 4 people MAX on the summit at a time.
Summit marker before boulders. Ruins trail is to the left.
20. [+00:16, +0.4km, 1062m] Ruins
At the bottom of the boulders which lead to the viewing point, next to where the above [summit marker] photo was taken, there’s a trail which continues on to some abandoned ruins. The journey takes about 15 minutes each way. Just follow the trail markers, it should be fairly clear.
At the ruins, turn back the way you came from. (I believe the trail continues on all the way down to Kuala Kubu Bharu, which some people have taken before)
Preparation
Notes
Poor/no phone coverage.
There are shallow river crossings (3 streams, 1 river knee deep). You’ll probably want to take off shoes to cross the river. Bring something to keep electronics/etc. dry.
In case of bad weather, injuries, etc., always be prepared for potential delays.
Petrol costs ~RM30-35 per car, RM10.80 [RM5.40 each way] toll from PJ (Damansara)
It’s the rainy season, be ready for rain and cold weather. I suggest packing an extra singlet or T-shirt to wear over in case.
A short 5 hour excursion to Gunung Angsi, up via Ulu Bendul, down via Bukit Putus.
DISCLAIMER: This post was written in 2012. Information may be out of date!
Location: Ulu Bendul, Negeri Sembilan, Malaysia. Start point: 2.727418N, 102.0758E 177m a.s.l. (Ulu Bendul) AND 2.727351N, 102.0562E 293m a.s.l. (Bukit Putus) Summit: 2.698775N, 102.047788E 836m a.s.l. Difficulty: Moderate easy. The Ulu Bendul trail is a little longer and has one fairly steep section (Botak Hill), otherwise both are standard jungle trails of average steepness.
Date climbed: 20 October 2012
Most of what I have read about Gunung Angsi seems to imply that the climb isn’t that interesting, and that Gunung Angsi lacks views. While there is some truth to this, Angsi is still a place I wanted to visit at least once. There are (apparently) 4 trails which lead up to the summit – via Bukit Putus, Ulu Bendul, a third trail I don’t know much about, and an apparently disused 4th trail. To see as much of Angsi as I could in half a day, we decided to take the Ulu Bendul route up, and return down via the Bukit Putus trail, and walk back along the road to our cars.
3 of us from PJ joined the Seremban climbing group that we hiked with up Gunung Ledang. We left PJ at 6.15am, and after a smooth drive, arrived at the Ulu Bendul recreational park at 7.30am. If you’re not into climbing, the recreational park is ideal for quite a number of outdoor activities such as camping, picnics, playing in the river (there’s a swimming pool of sorts filled with the river water), etc.
Before heading up the trail, we had to pay RM5 per person. Not the cheapest as I don’t believe there’s much maintenance needed on the trail, but fine. (If I’m paying money, I’d prefer a place like Gunung Datuk as they actually do have to maintain the ladders.)
The Ulu Bendul trail is definitely harder than the Bukit Putus trail, as it starts over 100m lower down, and is longer as well. The first 4km of the trail is pretty straightforward, and does not gain much altitude at all. We had to cross 2 small rivers, which some of us were able to do by hopping from rock to rock (which carries the risk of slipping and ending up with wet feet), while the others removed their shoes (safer).
Shortly after the 2nd stream crossing, the trail begins to climb continuously, although never really steep. The terrain was reminiscent of Nuang – wide paths and clay ground. About 2/3rds of the way up, we emerged at Botak Hill, an open area with steep sand boulders. There were ropes fixed along the left side of the climb, however, a few of us (me included) decided to use the right hand path, which although lacked ropes, looked like it had better footholds. (I tend not to trust ropes)
There’s a final steep climb after the rope section after which we emerged at the summit, about 840m up. There weren’t any “spectacular” views from the top, but we could see Seremban to the west, and more hills to the east. The journey up took us 2hr 50min at a relaxed pace, while going down the Bukit Putus trail took us about 1hr 30min. Along the way down, we passed by Panjang’s Rest Area, where there’s a good number of chairs to relax on, and one of the locals apparently gives out refreshments there, though no one was there on the day we climbed.
After we reached the start of the Bukit Putus trail, we walked back along the main road – 4km in total, which took us about 45 minutes.
For me, Angsi was more of a training climb, as I was carrying a lot more gear than I normally would (about 11kg in total). I didn’t expect any great views (and as expected, didn’t get many), but it was still an enjoyable climb with good company. If you’re planning to visit Gunung Angsi only once, I do recommend trying both trails as it gives you some different views along the way (i.e. Bukit Putus trail has some open views, while Ulu Bendul has some streams/rivers).
Photos
A pretty big spider (about the width of an average hand) we found along the wayLooking down from Botak Hill after climbing up halfwayA small ‘cave’ we went through just after Botak HillView to the east from the summit“Waterfall view”, though I’m not sure where the waterfall is. Along the Bukit Putus trail.Reservoir view along the Bukit Putus trail
A failed attempt on the majestic 1683m Gunung Rajah near Chamang, Bentong, Pahang.
DISCLAIMER: This post was written in 2012. Information may be out of date!
Not a full write up on Gunung Rajah – that will come when I climb Rajah successfully!
I decided to join the KL Hiking group for their Gunung Rajah climb on the 13th of October. I knew that it would be a tough climb – the longest and highest mountain I have done thus far, after Gunung Nuang. For those who don’t know, Rajah stands at 1683m tall, and the journey is about 26-32km round trip. It begins at Chamang waterfall, follows a logging trail for about 4km, a fairly easy jungle trail for 4.8km, a river crossing, another 1.5km uphill to Kem Lata Naning (then continues on to Kem Hijau, the false peak, rock face, and the summit, all of which I didn’t reach)
Even before the climb, I suspected that I would not be able to make it to the top, for quite a number of reasons:
I was sick for the week prior to the climb. I only got well 2 days before the climb, and not having exercised AT ALL for 2 weeks (the last being my Ledang/Ophir climb), I was lacking my usual energy.
I didn’t sleep at all the night before the climb – a problem I frequently face the night before climbs, but sleep was all the more crucial for this 12hr+ climb! Obviously, I just wanted to sleep the whole day!
I was carrying more weight in my backpack than usual – 1.5L more water than I carried up to Nuang, plus a 600g tarp/flysheet and some extra stuff.
My isotonic solution was more watered than usual. I was experimenting with reduced amounts of salt and glucose, but obviously it didn’t work out as well as I started cramping about 3.5hrs into the climb.
During the climb itself, I also didn’t hydrate as much as I would normally do as I was more reluctant to stop (being in a big group of 40 people, people don’t tend to stop when you stop for a break and you end up being left behind). And the rain didn’t help.
Yes, speaking of rain – the weather was fine when we started out, up until the 3hr mark when we passed Lata Naning, on our way to Kem Hijau. We were already prepared for rain as rain was forecast, so it was no surprise when it started raining (all the raincoats, rain covers, etc. came out). About the time the rain started, I also decided to turn back, between Lata Naning and Kem Hijau. I ended up staying with about 10 people at Lata Naning, before we headed back down to the river crossing.
When we had crossed the river on our way to the summit, it was ankle deep, and enough people were able to cross without taking off their shoes. However, when we got back to the crossing, the tiny stream had become a raging river about 8 feet higher than it was previously, with extremely swift currents. The crossing is where two rivers meet in a “Y” configuration, and this probably caused the depth to be even higher than normal. I was already aware of this possibility, and had seen and read accounts of this happening, but seeing it first hand was quite an awesome experience.
Obviously, there was no way we would cross in these conditions, so we set up my tarp/flysheet (which had also come in useful at Lata Naning) and waited. The river continued to rise a further 2 feet, and we waited for another 2 hours before the level started to subside slowly. After more than 3 hours, the level was finally low enough (waist deep) when 3 members of the team decided to cross and fix a rope to assist others. (Personally, I would still avoid any river more than knee deep, which is the highest ‘recommended’ depth for safe river crossings) However, they managed to get the rope into place safely, so we all crossed over and I got back to the car park just before 6pm.
I waited for the rest of the people in our carpool, the last who reached back around 8-9pm. Most of them managed to reach the summit, which was a great achievement!
What I learned from the climb:
Rest is VERY important before a climb! And don’t try a huge climb just after recovering from an illness…
Watch your hydration and nutrition on long climbs
BE CAREFUL around rivers and waterfalls, especially if there’s a chance of rain (especially upstream, which you may not see). Rivers can swell by many feet in MERE SECONDS, and if you’re not paying attention, you could be swept away and be killed. DON’T PLAY AROUND with swift/deep waters, they CAN and WILL kill you. I saw a river rise by 10 feet, and mind you, the rain was fairly short and not the heaviest.
Be prepared to stay longer than your allocated time. I myself was ready for this possibility, but not everyone else was… (especially if it had kept raining – the river could take a long time to subside)
Anyway, I’ll be back at Gunung Rajah at some point in the future!
River Dangers
Here’s a photo of how rivers can change with rain. The river we crossed (which rose by 10 feet) was a few km upstream from this (Chamang) waterfall. Mind you, by the time I got back to this waterfall, the water level at the crossing had already fallen by 4 feet, so I can only imagine how much higher the waterfall level was at its highest.
Difference in levels before and after a medium rainfall
As circled in the photo, you can see that the warning signpost in the left photo (taken 2 weeks prior to the photo on the right) has been ripped out, probably by water which was high enough to reach it. Given that rivers can swell in seconds, it would be pretty scary being at the bottom when the first flash flood arrives. BE CAREFUL AROUND WATERFALLS AND RIVERS!!!
Other Photos
Same photo of Chamang waterfall as above, taken on a lovely dayThe logging trail at the startOpen area – turn right off the logging trailAnother lovely open area along the jungle trailRiver at Lata NaningRiver at Lata Naning, looking the opposite directionSame photo as used earlier – Chamang waterfall after rainfall
GPS Details
Since I didn’t manage to complete a full circuit, I won’t be posting full GPS details, unless you want it, in which case leave a comment! (There are other full GPS trails available from other hikers) Here’s a photo of how far I got (I stopped recording at Lata Naning after turnig back):
Gunung Ledang, the highest peak in the state of Johor, is said to be one of the most popular mountains in the Peninsular Malaysia. After my trip there, it’s easy to see why – the climb is very interesting, and the views (on a clear day) are great. Gunung Ledang is not part of any mountain range, and thus standing at 1273m provides unobstructed views of its surroundings.
DISCLAIMER: This post was written in 2012. Information may be out of date!
Location: Sagil, Tangkak, Johor, Malaysia. Start point: 2.34163N, 102.617293E 122m a.s.l. Summit: 2.373418N, 102.607976E 1276m a.s.l. Difficulty: Moderately hard. Varies from standard easy jungle trail (like Gasing Hill) to fairly steep sections, but climbing aids such as ropes & ladders are provided at difficult sections. Involves some (rope aided) rock climbing sections.
Date climbed: Sat 29 Sep 2012
Gunung Ledang from the road
Gunung Ledang, the highest peak in the state of Johor, is said to be one of the most popular mountains in the Peninsular Malaysia. After my trip there, it’s easy to see why – the climb is very interesting, and the views (on a clear day) are great. Gunung Ledang is not part of any mountain range, and thus standing at 1273m provides unobstructed views of its surroundings.
Unfortunately, one of the hardest parts of climbing Gunung Ledang is the cost involved – (as of September 2012) for a local, it costs RM27 for insurance and permits, and guides are compulsory at RM220 each, each taking up to 10 people. In other words, the cheapest you’d be able to climb it for (with 10 people) is RM39 per person. Of course, all this is excluding any transport fees. I was lucky enough to find a group which was climbing it with an optimal number of people, who handled all the bookings. (We were required to submit our names, contact, NRIC #, next of kin & contact).
Along with 3 other friends from PJ, we headed down to Tangkak at 4am. (Most sane people would question why 4 people would do this on a Saturday when one could be sleeping in!) After meeting the rest of the group and eating breakfast at Tangkak, we headed to the registration & start point of Gunung Ledang. The road leading there is fairly new, and not yet marked on Google Maps. (If I remember correctly, the turn off is somewhere just after passing through Sagil) Facilities at the registration center are quite decent; there are bathrooms and dorms available, as well as drinks & food available for purchase. Before climbing Ledang, we were all required to fill in rubbish declaration forms, which would be checked upon our leaving. Even though the checking was not the most thorough, I think it’s a good thing in general – PLEASE always do not leave rubbish anywhere when you go climbing!
Even though we were scheduled to begin climbing at 7.45am, we had to wait until 8am for the guides to arrive. After a short briefing, we set off on our ways at 8.26am. There are 8 checkpoints (CP) in total along the Lagenda trail which we took, although we skipped CP4 as it’s used by campers who stay overnight, and off the main trail. Between the start and CP1 (Bukit Semput) @ 263m were mostly concrete steps – a nice easy start (On this day, I decided to take things at a relaxed pace as I was still a bit tired from my Gunung Nuang climb). We reached CP1 at +00H:16M (8.42am), after which we were off concrete paths and onto standard jungle trails, which were nice and dry. (Leeches are said to be few at Gunung Ledang – I did see one throughout the whole day, but no one got any bites).
The trail is fairly easy up until CP5, with gradual climbs and a short descend just before CP5. We passed CP2 (Hentian Meranti) [363m] at +00H:30M (8.56am) and CP3 (Batu Orkid) [519m] at +00H:55M (9.21am). Since we were bypassing CP4, the trail between CP5 and CP5 took longer. We arrived at CP5 (Sungai Segi Tiga) [682m] at +02H:00M (10.26am), where we found lots of other people waiting around. There is a small stream at CP5 where you can refill your water (apparently drinkable), although I always recommend treating/filtering any water.
Lots of people at CP5
Things got much steeper after CP5, where we hit the start of what is known as “KFC” – not the restaurant franchise, but the “Killer For Climbers” (or Killer Fitness Center) section. It’s actually not too bad, as ladders were provided at many sections, and we just adjusted our pace accordingly. The steepness is similar to what you get at Saga Hill Route A.
Start of the many ladders at the KFC section
We arrived at CP6 (Gua Kambing) [877m] at +02H:48M (11.14am). At this checkpoint, we had to climb through 2 small cave sections, which was easy enough given the ladders & ropes provided. If you’re the first to go through, you’d probably want to check for snakes or other creatures!
Climbing through the caves at CP6 “Gua Kambing”
We headed on to the famous “Batu Hampar” (rock face) section, which we reached at +03H:18M (11.44am). This section consists of 3 ‘rocks’ with smooth faces at ~40-60 degrees. The first two are quite easy, and can also be climbed using the tree roots at their edges.
Batu Hampar rockface, 1 of 3Batu Hampar rockface, 2 of 3
The largest of the rocks is probably about 30m high, and is scaled using thick ropes. To be honest, it wasn’t that difficult. If you don’t have the strength, you just have to remember that you can stop halfway and take a break.
Batu Hampar rockface, 3 of 3, showing its steepnessBatu Hampar rockface, 3 of 3, about 1/3rd of the way up
CP7 (Bukit Botak a.k.a. Bald Hill) [1131m] was reached at +04H:05M (12:31pm), where we took a short break and ate some food. (At this point, some people were starting to suffer from muscle cramps)
CP7 Bukit Botak (Bald Hill)
From CP7, we descended a short way before making our way to the summit through a series of about 10 ladders.
Climbing the many ladders to the summit
We finally emerged into the open and onto the top at +04H:44M (1.10pm). Being an isolated mountain, the summit provides pretty awesome views (unfortunately the weather wasn’t that clear), a bit like Gunung Datuk, except MUCH better. I’d recommend that you bring a hat just in case it’s hot at the summit.
Summit view 1Summit view 2Clouds at the summitSummit marker stoneTelecommunications tower near the summit
After sitting around for a while, admiring the views and eating our lunch, we headed down a different path (makes sense, otherwise there would be traffic jams at the ladders & ropes). The way down is along a different type of terrain with spongy ground (reminiscent of Gunung Bunga Buah near the rock garden), and we rejoined the main trail between CP3 and CP5.
Pitcher plants along the way downGinger flowers (I think) along the way down
We finally reached the registration center at +08H:33M (4.54pm), where we sorted through our garbage forms, cleaned up, and headed back to PJ.
I have to say that while Gunung Ledang is not the hardest of mountains to climb (definitely easier than Nuang), it is one of the most interesting. I’d definitely recommend that everyone should climb it at least once, if you are able to swallow the costs. I met a few people along the way who have climbed it more than 30 times, and after my experience, it’s easy to see why.
Duration: 7 hours 54 minutes
Length: 12.6km
Average Speed: 1.6km/h
Max elevation: 1293m
Min elevation: 122m
Vertical Up: 1418m
Vertical Down: 1416m
Preparations
Gunung Ledang, the highest mountain in Johor, should take a person of average fitness (with regular exercise) less than 10 hours for a round trip.
Notes:
Climbing costs ~RM39 per person (Sep 2012), add RM20 if non-Malaysian. (You have to book guides in advance)
Center opens at 8am, facilities are pretty good
There is periodic phone coverage along the way, and decent coverage at the summit. (Maxis)
2 stream crossings (CP5, and on the way down), both of which you can simple step across with shoes on.
Rain protection is recommended for any electronic items or clothing.
Very few leeches, but it IS a tropical jungle, so don’t be surprised to see a few
If you are prone to chaffing, apply vaseline/bodyglide/etc. as necessary.
Hiking stick is optional (may get in the way while climbing ladders/ropes), but can help on the way down
Checklist:
Minimum 3L fluid, isotonic recommended. I personally brought 3.3L on this trip, which was barely enough. (You can also refill water at the streams, which recommend you treat/filter)
High energy snacks/lunch
Hiking shoes & extra socks for comfort, if you need
Raincoat/poncho
Small towel (for sweat/etc.)
Insect Repellent
Small plastic bag to keep electronics dry in rain
Extra clothes (both shirt & pants), can leave in car
Plastic bags for dirty shoes/clothes, can leave in car
Slippers/Sandals to change into afterwards if shoes are muddy
Gloves (while climbing ropes)
Emergency gear: flashlight, whistle, knife, lighter, 1st aid kit, etc.
Optional: cap/hat, tarp/flysheet, cord/string, mat, water filter/tablets, etc.
After my 1st attempt at climbing Gunung Nuang and failing, I have been itching to go back and try again. Many non-outdoorsy people who have climbed Nuang before may think I’m crazy – after all, what does Nuang have to offer besides a long, boring road and leeches? Surely I could just jog around the field outside my house for the exercise, right? Well, read on to find out what Nuang had in store for the 2 of us who finally made it up to the summit this round!
DISCLAIMER: This post was written in 2012. Information may be out of date!
Location: Pangsun, Hulu Langat, Malaysia. Start point: 3.21733N, 101.883156E 190m a.s.l. (map) Summit: 3.266543N, 101.900246E 1493m a.s.l. Difficulty: Fairly hard. The trail itself is actually manageable – it’s wide and there aren’t too many obstacles. All you need is a lot of strength & endurance, especially if you’ve never done a full day climb before.
Date climbed: Wednesday, 26 September 2012
Warning: This write up is more of a story than just information about Nuang! If you just want information, the GPS details & Preparation sections will interest you more.
After my 1st attempt at climbing Gunung Nuang and failing, I have been itching to go back and try again. Many non-outdoorsy people who have climbed Nuang before may think I’m crazy – after all, what does Nuang have to offer besides a long, boring road and leeches? Surely I could just jog around the field outside my house for the exercise, right? Well, read on to find out what Nuang had in store for the 2 of us who finally made it up to the summit this round!
First of all, my reasons for climbing Nuang:
For those who enjoy climbing, it’s the highest mountain in the state of Selangor, and a worthy achievement – a stepping stone to larger mountains.
It’s used as a benchmark of fitness. On many hiking clubs, they will rate their climbs in relation to Nuang, or have prerequisites such as “have done Nuang in 10 hours or less”.
It’s the closest [real] mountain to PJ/KL, being less than an hour’s drive away.
It gave me confidence to tackle higher mountains, and to know that mountains such as Ledang, Kinabalu, Rajah, etc. were doable. (Actually, many people say that Nuang is harder than Kinabalu)
I just had to, after failing the 1st round. I just couldn’t let Nuang remain undefeated!
Weirdly enough, I wasn’t even supposed to have climbed Nuang on this particular day – I was scheduled to climb Gunung Rajah with my friend Lee YK on a 2 day 1 night trip (24-25 September). However, we had to cancel the trip as we weren’t allowed into the trailhead, even though we were all packed and drove all the way there. So, we decided instead to tackle Gunung Nuang, which would be my 2nd attempt, and YK’s 3rd summit attempt. Both of us really wanted to conquer Nuang at some point, so why not now?
Well, Nuang was not going down without a fight!
On Wednesday (the 26th) morning while I was still sleeping, I was awakened to the sound of thunder, and it shortly started raining hard. By the time I rose at 4.20am, the rain had subsided to a drizzle. I texted YK asking whether we should still attempt Nuang. We decided to go there anyway, and to turn back if necessary. (I’ll be honest – for the 1st half of the climb I expected to have to turn back not reaching the summit) By the way, I should note that I generally never recommend climbing with just 2 people. At least 3 is always a good thing.
We drove in a heavy drizzle and got to the base of Gunung Nuang at 5.50am. Nuang begins with a 5.8km wide road which gradually goes up and down, gaining altitude from 190m to 500m. Armed with my trusty flashlights (2x 4sevens Quark 123^2), we entered the trail at 6am, by which time the rain had stopped. Regardless, the place was unbelievably humid and warm (being at a relatively low altitude), thus the going was hot.
Just 10 minutes into the climb, the rain started again. I turned to YK and was going to say “I think we should turn back”, but instead just asked him what he thought. He was game to carry on, so we donned our raincoats (YK’s poncho was pretty much just like a large plastic bag); I stole YK’s rain cover for my backpack, and continued. However, just a few minutes later, we were both overheating from having raincoats on, while still being wet (the sweat and water was not evaporating), so we took them off and decided to just continue in our regular clothing. We did get wet, but it was much cooler! (Also, the rain was just a mild drizzle at this point)
We reached the end of the “never ending road” (an oxymoron?) +01H:17M (6:27am), at an altitude of 511m, quickly eating some peanut butter sandwiches for breakfast. (At this junction, KEEP LEFT to continue along the trail. Do not go down the steps to cross the river, even though the trail on the opposite side of the river looks more inviting!)
We continued, crossing a total of 5 rivers (all of which can be crossed with shoes on with ‘normal’ water levels, although you’d better be careful not to end up with wet feet!). The water levels were slightly higher than the last round, but still manageable. We reached the big Kem Lolo hut at +01H:31M (6:41am), where I reapplied insect repellent, left 1 liter of water for the return journey, and we continued.
The path between Kem Lolo and Kem Pacat was pretty muddy, with many pools of water collecting. However, I didn’t think it was too bad. Since we were ahead of schedule, we took a more relaxed pace with regular breaks so that we wouldn’t wear ourselves out. We were on a strict lookout for fallen branches, as YK had badly bumped his head the previous round. Needless to say, he avoided it this time! The drizzle was light all the way up until Kem Pacat @ 1095m, which we reached at +03H:22M (9:32am), half an hour faster than our last climb, even with the slippery slopes. (On the last climb, I was not nearly as fit, and was constantly huffing and puffing all the way to Kem Pacat even though I had offloaded ~3kg of water & gear to my friends!) I knew at this point that once we pushed onwards, we would try to summit no matter what, having come this far.
After eating more peanut butter sandwiches, we pushed on towards Puncak Pengasih (the false peak). Nuang unleashed a new weapon upon us – heavy rain! The trail quickly became a small stream, with water flowing everywhere. Soon, we were wet beyond caring, such that we would just step in puddles without thought, since our feet couldn’t get any wetter! The terrain after Kem Pacat also becomes a lot steeper (which makes me glad I stopped at Kem Pacat last round when I was much less fit), so we took our time and trundled on towards Puncak Pengasih @ 1475m, which we reached at +04H:45M (10:55am). Thankfully, the rain started to slow down at this point, but Nuang did not back down – we were hit by a gale force wind, which I have never felt before in Malaysia, and in fact did not believe that such winds existed. I was in fact worried that some branches may fall down on us. The good thing is that for most of the time, the trees really reduced the amount of wind which actually hit us.
Neither of us had ever been beyond Puncak Pengasih (the place where YK turned back on the last trip), so we were on an unknown path from here on. The terrain between the two peaks is actually not too difficult – the descent & ascent to the valley in between the peaks is very rocky. In the middle of the valley, it’s mostly sandy/soil, which in our case meant huge pools of water, which we just stepped in because our feet were soaked.
However, Nuang wasn’t going to give up that easily! Just 5 minutes before the real summit, we came across a tree which had fallen across the path. There was a huge wasps nest on it, which was thankfully empty. However, there were a lot of small branches blocking the path, a few of which were covered with hundreds of ants. Just a minute later, I felt a sharp bite on my hand, and found a tiger leech (different from the normal leeches whose bites don’t hurt) which had just bit me! I quickly removed it, and sprayed it with insect repellent for good measure, so it wouldn’t return. To be honest, coupled with a few ant bites and the fallen tree, I was ready to turn back at this point. However, YK said he’d take a look, and promptly crashed his way through the branches. Nothing was to stop him!
Indeed, at +05H:26M (11:36am), I noticed the tree cover thinning, and we emerged onto the summit @ 1493m. I can hardly describe the feeling of reaching the summit after a long slog through the jungle. It feels like you’ve won the most important race in your life! It was AWESOME. It was also VERY windy and cold. Originally we had planned to eat lunch at the summit, but (1) we were ahead of schedule, and it was still early; (2) it was really cold, and we wanted to get back under the cover of the trees from the wind; and (3) I knew there was more rain forecast for the afternoon.
We quickly ate some snickers, snapped some photos (no rain at that point of time, thankfully!), and headed down, squeezing back through the fallen branches. We reached Kem Pacat at around +7hrs (1pm), where we ate the best tuna sandwiches ever. We didn’t linger, and headed back down towards Kem Lolo, taking a few slips and falls along the way. It did start to drizzle again, and the jungle was very dim. We reached Kem Lolo at ~ +9hrs (3pm), where we bathed our feet in the rivers. The cold water on our feet was amazingly refreshing!
Finally, we got back to the ‘never ending road’, and the skies also started to lighten up. As a parting gift, Nuang decided to throw 3 leeches simultaneously onto my legs, which gave me bloody socks and itchy scars. How annoying! (YK also got his share of leech bites along the way) My wet feet & toes were starting to become sore from constantly rubbing against each other, but we emerged out from the jungle and back into civilization at 4.40pm. Interestingly, besides my sore feet due to wetness, I was actually feeling not too bad – not as exhausted as I have been on some of my other climbs.
So, would I do Nuang again? Definitely yes! I’m in fact very glad I climbed Nuang in the rain, because (1) when you go outdoors, you’re bound to get wet sometime, and (2) I got to experience some things I wouldn’t otherwise have – for instance, the howling wind. It was quite an amazing wind. Of course, we didn’t see anything along the way, since the skies were just filled with clouds & mist. Hopefully when I go back, it’ll be on a clear day so that I can actually look out from Nuang! The trip was definitely worth it, and I think YK said the same, reaching the top after so many tries!
Photos
Eating breakfast at the end of the ‘never ending road’Waterfall near Kem LoloReaching Kem Pacat (Leech Camp)The famous tree at Kem PacatGunung Nuang’s summitThe metal shelter marking the summitMalaysian flag at the summitOne of the few nice things we saw throughout the whole hike
Duration: 5 hours 15 minutes
Length: 11km
Average Speed: 2.1km/h
Max elevation: 1491m
Min elevation: 189m
Vertical Up: 1717m
Vertical Down: 411m
Preparation
Gunung Nuang, the highest mountain in Selangor, takes a person of average fitness (with regular exercise) 4-6 hours to summit, and 3-5 hours to descend (Total about 7-11 hours). I would not recommend it as a first climb (though it’s definitely doable if you’re reasonably fit) – try something like Bukit Kutu or Gunung Bunga Buah first.
For an 11hr climb, my _estimated _time to checkpoints (distances & elevations following my GPS):
00:00 Start (0km, 190m)
01:30 End of never ending road (5km, 510m): When you see a junction, keep LEFT (you’ll end up following a pipe); don’t go down the steps across the river. Keep following the pipe (cross the river when it does) up to Kem Lolo. There are a total of 5 river crossings.
01:45 Kem Lolo (5.3km, 510m)
03:45 Kem Pacat (9.3km, 1090m): The trail gets MUCH steeper and rocky after this, and there may be more obstacles.
05:15 Puncak Pengasih (10.6km, 1475m): You’ll have to descend through a valley to reach the real peak. Remember where you came from as there are a few paths leading to Puncak Pengasih, I believe.
06:00 Summit (11.4km, 1493m)
06:45 Puncak Pengasih
08:00 Kem Pacat
09:45 Kem Lolo
11:00 Back to base
Follow this ONLY as a guide! I recommend that however fast you are, to allocate at least a 12hr block for climbing, in case of any delays or bad weather.
Notes:
You may have to pay RM1 per person. The sign also says to register at the police station (always a good idea), but we didn’t notice this until we finished.
Poor phone coverage. There is sporadic coverage between Kem Lolo and Kem Pacat (Maxis). After Kem Pacat there was no reception at all.
5 river crossings. At normal levels, you can hop from rock to rock without having to take off your shoes.
Rain protection is recommended for any electronic items or clothing.
There are quite a lot of leeches around, especially if it rains beforehand (or during your climb). Wear protection as necessary.
If you are prone to chaffing, apply vaseline/bodyglide/etc. as necessary.
A headlamp/flashlight is essential!
Checklist:
Minimum 3L fluid, isotonic recommended. I personally brought 4.5L on this trip, leaving 1L at Kem Lolo and 600ml at Kem Pacat, and it was just enough, but I sweat more than most people. YK brought 3L which was sufficient.
High energy snacks/breakfast/lunch
Hiking shoes & extra socks for comfort, if you need
Raincoat/poncho
Small towel (for sweat/etc.)
Hiking stick
Insect Repellent
Small plastic bag to keep electronics dry in rain
Extra clothes (both shirt & pants), can leave in car
Plastic bags for dirty shoes/clothes, can leave in car
Slippers/Sandals to change into afterwards if shoes are muddy
Emergency gear: flashlight, whistle, knife, lighter, 1st aid kit, etc.
Optional: gloves, tarp/flysheet, cord/string, mat, water filter/tablets, etc.
Saga Hill (Bukit Saga) is actually just one peak of many on a hill with a large, flat top, near Cheras. After the many mountains that I have been climbing, Saga Hill is definitely a very easy climb, with well maintained trails and a reachable summit of ~430m. There are many routes to choose from, which start from various sides of the hill. Saga Hill refers to the hilltop nearest the small town of Taman Saga, where the starting point is.
DISCLAIMER: This post was written in 2012. Information may be out of date!
Location: Taman Saga, Cheras/Ampang, Malaysia. Start point: 3.113788N, 101.773276E 149m a.s.l. End point: [Varies] Highest point – 3.111677N, 101.779017E 342m a.s.l. Difficulty: Easy. Recommended for beginner hikers. The only danger is getting lost amongst the huge network of trails.
Saga Hill (Bukit Saga) is actually just one peak of many on a hill with a large, flat top, near Cheras. After the many mountains that I have been climbing, Saga Hill is definitely a very easy climb, with well maintained trails and a reachable summit of ~430m. There are many routes to choose from, which start from various sides of the hill. Saga Hill refers to the hilltop nearest the small town of Taman Saga, where the starting point is. (Another popular route starts from Cheras Awana, where the hill is called Apek Hill) Don’t expect any good views of the surrounding area, as there are always lots of trees blocking the view. If you want a view close to PJ/KL, I suggest Bukit Tabur or Broga Hill. It is actually possible to become lost at Bukit Saga due to the huge network of trails which join the various peaks and climbing routes together. A few of the major trails are marked, but it’s probably a good idea to remember which trails you go on, or, like me, use GPS to record your trail so that heading back is an easy task.
I’ve climbed Saga Hill twice in the past (I never blogged about them), but always took the same route. For this 3rd time, me & my friend decided to check out the waterfall, and take a different route down. I was there for a very relaxed hike as I had 2 big climbs coming up the next week, while my friend was there to train for Mt. Ophir (Gunung Ledang). Thus, he filled up his bag with 12kg of weights and water, so that we would get different amounts of exercise at the same pace.
The residents (many of which are more senior and like to climb every day) apparently prefer that climbers don’t park too near their houses, so the suggested parking space is a small park in front of a kindergarten (I think). From there, Saga Hill is clearly visible.
Saga Hill from the parking lotSmall waterfall near the entrance
After passing the small waterfall at the start, there are 3 routes to choose from.
Route A is the shortest, and possibly the most popular. Since it is the shortest, it is also the steepest, but has a huge amount of tree roots along the way, which make it easy to find places to step and does not become slippery. There is also a short rope climbing section (up some rocks), which can be bypassed.
Route A – View of CherasRoute A – lots of tree roots provide natural stepsRoute A – Optional rope/rock section
Route B – I have yet to climb this. I’ll fill up this section once I’ve done so!
Route C is slightly longer than route A, and is less steep, and in my opinion, slightly easier. However, shoes with decent grip helps a lot as the ground is bare, so it may be challenging at times to find grip (Similar to Broga Hill). I personally found no issues with my hiking shoes, climbing after a heavy rain, so I’m not sure why people call this ‘Route C-hallenging’.
Route C – View of Cheras
I can’t remember if there’s a Route D anywhere, but I think I remember hearing of it once.
Saga’s hilltop has no view, but contains a large number of benches/tables, exercise equipment, and even a ‘changing room’ of sorts. From there, you can head to a small waterfall, which is less than an hour away. Some people argue whether it’s worth the hike.
Small waterfall
Between Saga’s hilltop and Route C lies a beirut (I’m still not sure where the term comes from), which presumably marks the highest point of Saga Hill.
Beirut @ 432m
There’s much to explorer at Saga Hill, as long as you’re not interested in views which look out, which are pretty much nonexistent. However, Saga Hill provides a decent amount of exercise while still being relatively close to PJ/KL (Of course, driving there is not always as pleasant, in my experience)
A short excursion to Bukit Tabur East, the less known trail of Bukit Tabur, but just as risky.
DISCLAIMER: This post was written in 2012. Information may be out of date!
Location: Taman Melawati, Kuala Lumpur, Malaysia. Start point: 3.232641N, 101.749952E 85m a.s.l. End point: 3.232116N, 101.75739E 345m a.s.l. Difficulty: Very high risk, moderately difficult. Short, easy in terms of strength/endurance needed. However, very steep slopes (60-80 degrees), rocky terrain and vertical drops increase the risk and “scare” factor. Not recommended for people afraid of heights.
Back in May 2012, I climbed Bukit Tabur West with 2 of my friends. I never got around to blogging it, but while researching Tabur West, I also read a fair bit about the slightly more elusive Tabur East. It’s been quite a while since then, but I finally managed to make a trip to Tabur East.
Opinions on Tabur East tend to vary, with some saying it’s more difficult than Tabur West, and some saying otherwise. Regardless, the terrain is very similar to Tabur West, with similar techniques and care needed while climbing. The trail itself is shorter than Tabur West, but I think the slopes are slightly steeper (and go on longer).
The start of the hike is along the road with 2 big pipes running parallel to each other (see on Google Maps). After parking, this is the sight which greeted us:
Tabur East
Walking down the road, there is a small bridge which crosses a small river, after which the tarmac road ends. The trailhead is just a bit further (following the big pipes), on the right hand side. It’s marked clearly by a “Dilarang masuk tanpa kebenaran” (No entry without permit) sign, which we entered.
Trail head of Tabur East
The trail is immediately steep uphill, first through jungle terrain (sandy/soil ground), which is slowly replaced by rocky ground. Within 10 minutes of climbing, we reached the rope sections. (I do not recommend you use the ropes unless you have to – rocks almost always provide better grip, and they don’t swing around. Only use the ropes when there are no rocks to grip, or if you really need extra stability!
Shortly into the climb, there is a viewing point of KL and the dam, which I don’t recall being able to view from Tabur West (However, I climbed Tabur West in the dark, so I may be wrong).
First view of Kuala LumpurView of the Klang Gates DamView of Tabur West from Tabur East
After being stuck behind a group of about 10 people for 20 minutes, we decided to overtake them. Another piece of advice: find a safe place to overtake, and let the group know beforehand. Don’t pressure them to move faster than they are comfortable with! Not long after that, we emerged into more open terrain. There was no lack of viewing spots, providing great views of KL, forest, mountains and much more. Some photos:
View of the beautiful lakeOur goal – the summit of Tabur East, taken along the way.
Once on the ridge, the climb towards the summit didn’t take long. It involved going both up and down, over rocky area and through a short jungle section. Right before the summit is a junction – one apparently leads out (we didn’t take this path), the other leads to the final ascent: a steep and long 60-80 degree long section with ropes along the whole way. Again, I do not recommend the use of ropes unless they are really needed! It took us about 10 minutes to scale the last section, after which we emerged at the beautiful summit. The weather was beautiful, although it did make it really hot, with a scorching sun at only 10am! Here are some panoramas I took (click to view full size):
View from summit, to the eastView from summit, to the west
Just a few minutes further on, we came to the end of our journey, our progress halted by a high vertical cliff, impassable to any (except with climbing gear, perhaps).
End of Tabur East
Further peaks are visible – apparently they can also be climbed, if you google Tabur Far East/Tabur Extreme Far East/etc.. Perhaps I’ll try climbing them one day?
Summit of Tabur “Far” East, unreachable from Tabur East
Also visible for much of the climb were quartz formations. They were far more plentiful than when climbing Tabur West
Quartz Formation
We returned the same way we came from. In total, we ran into about 30 other climbers that day. Also, when we got back to our starting point at noon, the heavens opened and poured a TON of rain. I hope the other people who were still climbing were safe!
Tabur East is a good training ground if you want challenging terrain but lack time, as it’s very close to PJ/KL. In fact, my muscles ached a bit the day after (more so than when I climbed Bukit Kutu/Gunung Nuang/etc.), probably because of the much wider range of motion needed while climbing Tabur East – at some points the steps are extremely far apart! It’s not too challenging physically, but is much higher risk than any of the other mountains I’ve climbed in Malaysia. I have to say that I have not yet found any other place which is like Tabur, which offers an extremely interesting climb with stunning views. Just stay safe if you decide to go! And I mean that VERY seriously!
A not-too-difficult 6hr round trip hike up Pine Tree Hill (1461m) near Fraser’s Hill. Beautiful view, and cool & refreshing trail, all above 1200m.
DISCLAIMER: This post was written in 2012. Information may be out of date!
Location: Fraser’s Hill, Malaysia. Start point: 3.712077N, 101.728494E 1329m a.s.l. Summit: 3.710520N, 101.697086E 1461m a.s.l. Difficulty: Moderate. Mostly easy trail, but contains a fair number of tree trunks to clamber over/under.
Date climbed: Fri 8 Sep 2012
For a while, I’ve been interested in climbing Pine Tree Hill as it’s known to be a relatively easy hike, but most importantly it’s a cool hike as all climbing occurs above 1200m. Especially after climbing mountains like Gunung Nuang and Gunung Datuk which can be quite hot, I was interested to have some cooler hikes, hence Gunung Bunga Buah, and now Pine Tree Hill. The only reason why I had not made the trip to Pine Tree Hill previously was the amount of time it takes to drive up to Fraser’s Hill from PJ.
A group of us decided to make the trip last Friday, and we left PJ at 7am. After making a few wrong turns, loosing half an hour in the morning rush hour, we made it up to the top of Fraser’s Hill at 9.30am. We quickly registered with the Police Station (whenever there are authorities you can register with, even better for free, it’s always recommended!), and made our way to the start of the Pine Tree Trail, and entered at 9.55am, half an hour later than we had planned for.
Entrance to Pine Tree Trail
We had set our turnaround time at 1.30pm, so we would have to move fairly fast to make it to the top. The weather was beautiful throughout the whole climb – it was mostly cloudy with patches of sunshine, although at times we did worry whether it was going to rain!
Just a few minutes after entering the trail, we got our first ‘open’ view of the surrounding hills and valleys.
View of hills & valleys near the start of the trail
The trail is very well defined for the whole way, and we passed by (if I remember correctly) 3 rest huts – one right at the start, another about 1km in, and a broken hut (doesn’t provide any shelter) a little bit later on.
2nd rest hut & broken hut
In addition, we passed by an interesting tree root formation which one can crawl under. (Sorry for the poor photo quality)
Tree Root “Shelter”
About 2/3rds of the way, we got our first [not so great] view of Pine Tree Hill itself.
First view of Pine Tree Hill
Around the 3.6km sign, we passed by a sign saying “Water Point”. Presumably if one follows the trail, it’ll lead to a water source. (Otherwise, that would be a pretty mean joke!) On the right, there’s an upwards trail leading to a campsite.
Trail to water point, with campsite nearby
Just before the summit of Pine Tree Hill, we reached the famous ‘rope section’, where we had to pull ourselves up steep rocks and soil (About 60-70 degrees). I recommend against the use of ropes while going up (hold it only for support, not for pulling), and instead rely more on grabbing the rocks – the ropes are more useful when descending. Remember that only one person should be using the ropes at any time!
Rope Section
At the top of the rope section, the left path leads to the “summit” of Pine Tree Hill. I’m not sure where the middle path goes. The right path leads to another beautiful viewing point on the other side of the hill.
View from the summit. Mt. Benum (2107m) is barely visible on the right behind the cloudsThe view back towards Fraser’s HillPanorama of the other side of Pine Tree Hill
We reached the summit at 12.50pm and ate lunch there. From the summit, one can actually go further on to the “twin peak”, which is a second summit close by, which should take about 1hr+ round trip. Unfortunately, we had to get out of the trail by 4.30pm (to get back to PJ by 7pm), thus we didn’t carry on.
Overall, Pine Tree Trail is a fairly beautiful trail to walk on – cool & refreshing. There are a decent amount of interesting plants along the way, although we didn’t manage to spot any of the pitcher plants we were on the lookout for. We did pass by a huge wasp nest on the way, although it didn’t look active (we weren’t about to test that theory!). Phone reception is fairly poor along the way, although at the summit of Pine Tree Hill you’ll get a decent signal. The one thing I’d recommend you watch out for is what you put your hands on when clambering over tree trunks – I put my hand right into a pile of dung which was covered with ants! It wasn’t pretty…
Duration: 2 hours 57 minutes
Length: 5.9km
Average Speed: 2km/h
Max elevation: 1461m
Min elevation: 1233m
Vertical Up: 648m
Vertical Down: 516m
Preparations
Hike is all within 200m height, but there are a lot of small ups and downs. Total ascent/descent both ways will be almost 1200m. Some steep sections with rope. Other parts have stairs, which makes it easier.
Average hike time is 3hrs to summit, 3hrs back. Going to Twin Peaks will take an extra 1.5hrs. Be sure to mark the trail well if you decide to go to Twin Peaks – I’ve read of people getting lost on the way back.
You can bring an extra labeled bottle of water and leave it halfway and collect it on the way back if you don’t want to carry it around.
Poor phone coverage
No river crossings
Temperature should be cool the whole way. Since we’re hiking you shouldn’t need a jacket, but you may want to bring an extra singlet/longsleeve shirt in case you get cold.
Pine Tree Hill isn’t famous for leeches, but there will likely be a few around
Checklist:
~2 liters drink, isotonic recommended.
High energy snacks & lunch
hiking shoes (or shoes with grip), extra socks for comfort, if you need
Raincoat/poncho
Small towel (for sweat/etc.)
Hiking stick
Insect Repellent
Small plastic bag to keep electronics dry in rain
Extra clothes (both shirt & pants), can leave in car
Plastic bags for dirty shoes/clothes, can leave in car
Slippers/Sandals to change into afterwards if shoes are muddy
Emergency gear: flashlight, whistle, knife, lighter, 1st aid kit, etc.
Optional: gloves, tarp/flysheet, cord/string, mat, water filter/tablets, etc.


")


