DIY Headlamp holder with nylon/paracord

Along the same lines as my DIY concealed belt, I realized that I don’t carry a headlamp with me all the time, but I have come across situations in which a headlamp would have come in useful. Since I already carry nylon cord and a flashlight, I made some DIY headlamp holder plans to help me out in those situations!

Along the same lines as my DIY concealed belt, I realized that I don’t carry a headlamp with me all the time, but I have come across situations in which a headlamp would have come in useful. Since I already carry nylon cord and a flashlight, I made some DIY headlamp holder plans to help me out in those situations!

1) Take a length of nylon cord / paracord (Of course, longer than the size of your head).

2) On one end, tie a bowline knot.

* In the next step, you will have to tie a loop whose name I have completely forgotten (If you know it, please let me know its name!). It is very similar to the Alpine butterfly, but with one less loop. Here’s a picture demonstrating how to tie it:


a) Loop the string 3 times around your fingers
b) Take the 3rd (right) loop and bring it across to the 1st loop…
c) …and push it under the 2 loops
d) Holding the loop, take the string off your fingers and tighten it

3) Just after the bowline knot, tie two of the above knots consecutively. Your string should now look like this:

4) Take the two loops, and place them around your flashlight, then pull them TIGHT.

5) Take the other untied end of the string, pull it through the bowline loop, and tie a taut-line hitch.

6) You’re done! Place the entire contraption over your head, and slide the taut-line hitch back and forth to adjust the size of the head lamp band. By adjusting the position of the 2 loops, you can, to some extent, change the angle at which the flashlight points. Don’t overdo it though – you may risk having your flashlight fall out from the loops! Additionally, you could probably make 2 more loops on the other side and mount a 2nd flashlight!

Here’s a picture of a CD/DVD container wearing a headlamp (This is my 4Sevens Quark AA flashlight):

And with a smaller flashlight (My Liteflux LF2XT):

I find that smaller flashlights tend to work better as they are lighter. However, there’s no rule against big flashlights! So, how’s a heavily modified Maglite 2D look as a “headlamp”?

Granted, my head started to tilt to one side with that huge behemoth attached!

Now, I don’t consider this to be a permanent solution for a headlamp – a real headlamp which is on the front of the head is still better, and can be angled up and down much more easily. However, if you ever happen to have only a hand-held flashlight and some cord, hopefully this guide comes in useful!

EDC while exercising – DIY concealed belt

If you have read my post on things I carry every day (EDC), you may be left wondering what I carry when I go exercising. Recently, I came up with a solution to carry my basic, essential items while jogging, without looking weird or weighing down my pockets.

If you have read my post on things I carry every day (EDC), you may be left wondering what I carry when I go exercising. Recently, I came up with a solution to carry my basic, essential items while jogging, without looking weird or weighing down my pockets.

I decided to make use of a length of string and some well known knots to make my own adjustable belt which I wear when I exercise, on which I can hang a number of items. In fact, after I made it, I found that it doesn’t bother me at all, and so I never take off my “belt” – I even wear it to sleep! (Of course, I do take off a couple items) So, I have decided to share this creation here!

1) Take a length of string. Preferably, you should use paracord, but any type of relatively durable/thick nylon cord should work. The length of the string depends on how many ‘hanging loops’ you want, but of course needs to be fairly longer than the circumference of your waist.

2) On one end, tie a bowline, double bowline, or figure-8 loop. In this example, I used a bowline because it’s a relatively simple and reliable knot, and I haven’t had issues with it.

3) Using the Alpine Butterfly knot, fashion as many loops as you want, in whatever positions you want them in. In this example, I made 4 loops, 2 for the left side of the waist, 2 for the right side.

4) Take the other (untied) end of the string, and pass it through the loop you made in step 2. You may want to wear your belt now to adjust the length as needed.

5) Tie a taut-line hitch. You can slide this knot back and forth to adjust the size of the belt to suit your waist. In my example, I used a slight variation (#1856) of the taut-line hitch, which is slightly less secure but easier to adjust.

Your belt is completed! Now, go ahead and hang items on it:

On my belt, I chose to hang the following items:

1) A small plastic namecard holder which holds my Malaysian National ID card, driving license, and some spare cash.
2) Swiss army knife
3) Whistle
4) Small flashlight

You can easily modify your belt to your needs! It’s simple, cheap and easy to make!

Now, when I go jogging, I don’t have to bother keeping my wallet with me because I have my ID & driving license. In addition, the spare cash can come in useful if needed.

Things I EDC (Everyday Carry), 2010

Sometimes, when I pull out something weird from my pockets, people ask me what kind of things I carry. Now, wonder no more – because this post will give you insight to the items I carry with me daily.
All items

Note: This list is outdated, and what I carry now is pretty different. Take a look at what I carry when hiking (not strictly EDC though).

Sometimes, when I pull out something weird from my pockets, people ask me what kind of things I carry. Now, wonder no more – because this post will give you insight to the items I carry with me daily. The term EDC (Every Day Carry) is often used to describe these kind of items, and you can google it to find out what kind of things people carry.

The items I personally carry are finely honed over years of carrying items, and so they may not be the best for other people. I continually change the items I carry, so what I will list is only effective at this current time. You can divide my EDC items into 2 categories:

1) Items I carry on myself
2) Items I carry in my backpack

Items I carry on myself

I generally try to conceal these items, as I don’t want to look like a person gone crazy – so when I am carrying these things, you probably wouldn’t even know, until I started taking things out of my pockets! These items tend to be small, and consist of things which have come in useful over time.

Here is a picture of all my on-person EDC items:
All items

From left to right:

[Top row]

  • Packet of tissues. This probably doesn’t need to be explained, it comes in handy all the time.
  • Phone. Again, doesn’t need to be explained.
  • Flashlight (Liteflux LF2XT). This one goes around my neck on a paracord lanyard, and is one of my favorite flashlights – it is fully programmable (various brightness levels which can be set), waterproof, and brighter than most of those big Maglights.
  • Concealed waist pouch. When I wear this, it is completely unnoticeable, which is great! Items inside shown later.
  • Flashlight (4Sevens Quark AA Tactical). My “main duty” flashlight, goes from really dim to really bright. It is tied to my waist pouch using a very useful quick release knot (The slipped lap knot), which prevents it from falling out, but at the same time provides quick & easy access. It is also clipped to my pants.
  • Swiss army Deluxe Tinker knife. This particular one comes with pliers in the middle.
  • Secondary wallet, with various items to be explained later.

[2nd row]

  • Wallet, which contains various items which will be shown later.
  • Keychain, which will be explained later.

[Not in picture] Clip-on sunglasses.

Concealable pouch

This contains items which will probably confuse you as to why I carry such random stuff, but here goes. It consists of a large back compartment, a medium middle compartment, and 2 small front (left and right) compartments. On the left and right are carabiners, to which are attached the swiss army knife, flashlight (Quark AA) and wallet (using nylon) [and not in picture, a 1 meter tape measure].


In the back compartment, from left to right:

  • A small 2 pronged fork. I have taped up the top to ensure it doesn’t poke anything
  • A small plastic spoon. I used to have a steel one, but it started rusting, and it was a bit heavy.
  • Comb. Self explanatory.
  • Extra ziplock bag (4″x6″). I’ve used this to store various items (I just used it to pack some leftover peanuts from a restaurant), as well as a waterproof container for my phone if it is raining.
  • Some tissues in a ziplock.
  • Guitar pick. It’s a Dunlop gator .71mm for strumming
  • Nylon fishing line
  • [Not in picture – several feet of copper wire]
  • Several rubber bands in a small ziplock
  • Foam earplugs (for nighttime use) in a ziplock
  • A twisty tie


In the middle compartment, left to right:

  • A small contact card with my details on it
  • Some paper and cotton buds in a ziplock
  • Extra plastic bag
  • A sealed plastic bag containing a surgical mask and star charts


In the front left compartment, left to right:

  • A tripled ziplocked bag (to keep out humidity) containing various meds like:
    • Carbon pills
    • Panadol/Tylenol
    • Piriton (antihistamine)
    • Buscopan
  • A ziplock bag containing:
    • A small lens (works as a magnifying lens)
    • 2 bandages
    • [not visible] some spare cash
  • A lighter
  • Small marker pen


In the front right compartment, left to right:

  • A signalling mirror in a ziplock, for use as a regular mirror as well as emergency signalling
  • A ziplock bag containing:
    • 2 rolls of masking tape
    • 1 roll of scotch tape
    • Nail clipper
    • Small and powerful magnet
    • Several paper clips
    • Several safety pins
  • A small vial of hand sanitizer (77% ethanol – also useful for cleaning)

Secondary wallet


I may not always carry this, depending on if I have enough pockets. Has 3 compartments, and contains the following, left to right, top to bottom:
[Top row]

  • Small plastic bag in small ziplock
  • One sad looking bandage
  • Some fishing line

[Middle row]

  • Chapstick (lip balm) for dry weather
  • 2 rubber bands
  • Err, silica gel to absorb humidity. I think it’s no longer working.
  • 2 batteries – A rechargeable Ni-Mh AA (Eneloop) and an Energizer Lithium AAA. (Sometimes, I carry a 3rd lithium ion battery)
  • A small black pen
  • Triple ziplock containing:
    • Safety pins
    • Rolled masking tape
    • Panadol/Tylenol and piriton (antihistamine)

[Bottom row]

  • Ziplock containing some paper, alcohol wipe and bandage
  • 2 toothpicks

Wallet


Besides the usual (some cards, id, cash, emergency contacts), I carry:

  • A ziplock containing an alcohol wipe, band aid, and a personal card
  • Picture of my college CF (HRAACF)
  • Some paper
  • A homemade chart of [music] notes and their frequencies, as well as my flashlight (Liteflux LF2XT) operation manual cheatsheet
  • Band-aid
  • A homemade chart containing various knots, in case I forget how to tie them

Keychain


Besides my keys:

That ends the list of all the things I carry with me at all times. I am, of course, missing some items which I wouldn’t mind adding, and some items which I should add. But I’m already at the limit of what I can carry without it becoming noticeable.

In general, if I were to recommend some items which EVERYONE should ALWAYS have, it would be these:

  • Tissue – I shouldn’t need to mention why
  • Small flashlight – Something which most people lack, but I have been in situations when the power went out, and I would have been trapped in a building if not for this. (Actually, it was because I got trapped in a dark building that I started to carry one) If you frequent the underground or buildings with sealed stairwells, THIS IS EXTREMELY IMPORTANT! Your cellphone screen does not count. You can get a simple coin flashlight for just $1 in most places, and it could save your life!
  • Whistle – If you get trapped, or if you are in a place out of sight
  • Small utility knife, if you can

Items I carry in my backpack

On longer trips or car trips, I will take my backpack with me. Now, this is where the ridiculousness starts, with the crazy amount of things I have in my backpack. Over time, I will probably streamline things a bit more, and take out some things which I don’t need.

Here’s my backpack:

It has 4 compartments and 2 side pockets.
Shown are the items in the side pockets: A small water bottle, emergency poncho, and emergency [mylar] “space” blanket.

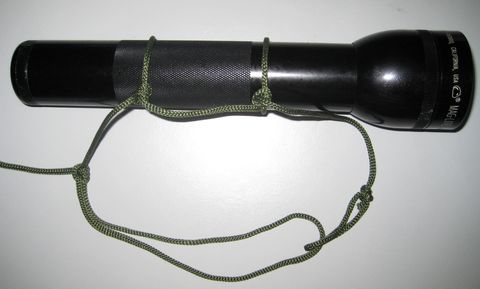
The 1st back compartment is usually empty, and contains whatever I may need to carry. However, it does contain this flashlight:

which may look like your average Maglite 2D. However, looks can be deceiving – it is actually a VERY heavily modified maglite which puts out more lights than your car headlamps and can shine up to 200 meters away! It can even start newspaper on fire if you try…

The 2nd back compartment is also relatively empty for whatever goods I may need to place inside. However, it does contain these items:

  • Pack of tissue
  • In-Ear headphones (Etymotic er4p)
  • Spare socks & spare t-shirt, for emergencies if I need to change (both inside a plastic bag)

Here is where things get crazy:

3rd compartment (near the front):

This compartment contains several sub compartments, but I will just show everything in the 3rd compartment:
From left to right:
[Top row]

  • Umbrella
  • Ziplock containing notepad and pen
  • A couple meters of nylon rope (waiting to change this to paracord)
  • Small philips screwdriver
  • Large philips screwdriver
  • Long tipped pliers
  • Red decorative string in ziplock

[Middle row]

  • A couple CDs used for troubleshooting computers
  • Small swiss army knife
  • Lighter
  • Double sealed, small tube of superglue
  • Short stick of hot glue
  • Self winding Mini-USB cord
  • Ziplock containing contact treatment (for electrical contacts) – DeOxit Red & Gold
  • Ziplock containing 2 Energizer Lithium AAAs

[Bottom row]

  • Big plastic bag
  • Salt
  • Pepper
  • Mini Card reader – a very popular item!
  • 3.5mm -> 6.5mm TRS converter (for headphones etc)

[Not in picture] 4GB USB flash drive


4th (front) compartment:
Left to right:
[Top row]

  • Metal chopsticks. They’ve come in more useful than chopsticks before, as they’re strong
  • Big ziplock containing:
    • Syringe
    • Surgical Gloves
    • Surgical Masks (2x)
    • Various 1st aid items such as:
      • Cotton buds
      • Antiseptic wipes
      • Bandages
      • Various pills
  • Tissue in ziplock
  • Ziplock containing various vials of:
    • Heavy grease/lubricant
    • Lighter fluid
    • Cleaning Alcohol (Isopropyl)
    • Detergent
    • Light oil
  • Toothbrush & Toothpaste

[Middle row]

  • Sealed bag of pemmican (Ground beef jerky & rendered beef fat) – Courtesy Shannon Wong who made this batch!
  • Two cereal bars
  • Small spray can containing water
  • Ziplock containing fork & spoon, teabags and aluminum foil

[Bottom row]

  • Tin can, in which I keep the remaining items on the bottom row. The tin can comes in useful as a bowl/cup, and it can also be put on a fire if needed (I did cook an egg in it once)
  • Ziplock containing roll of duct tape and masking tape
  • Ziplock containing soap
  • Ziplock containing eyemask

Practical ORTF recording project

Called to do a recording of the Shostakovich Piano Trio no. 2 performed by the Millfield Trio (Amy Yuan – Violin, Andrew Li – Piano, Mike Strahlman – Cello), here are my experiences on the research and technique and outcome of the project.

This project took me a bit by suprise, because my music tech teacher recommended me to do the recording for them. I agreed because it would give me some ambient recording experience, which I have never done before (at least, not seriously).

Recording would be done in a high noise-floor reverbrant music lodge (lots of traffic passing by). The look of the recording venue looked not too great, with the 7ft Steinway Grand piano very close to the brick wall behind and hardly any stage space. Musicians would be in close proximity and therefore reduce the stereo field.

The easiest technique would be the X-Y (crossed) pair cardiod mics, probably being AKG C1000s small-diaphragm condensers. Unfortunately, this teachnique has a narrow soundfield, and in the already narrow stereo field, it wouldn’t make it sound any better. In fact, we were in lack of a stereo bar.

After doing some research, I came across this technique called ORTF where cardiod mics are placed 17cm apart, with their capsules angled 110° apart. Any slight error in the placement could cause horrific phasing problems. Therefore, it would be necessary that a stereo bar be used. Sounded too troublesome, but more reasearch showed that ORTF yielded a better stereo field. So ORTF became my 1st preference.

I checked what choice of microphones I had access to, and I finally decided on taking a pair of AKG C414 B-ULS wide diaphragm condenser microphones as the main stereo pair. I also decided that spot miking could improve it, so I chose 2 AKG C3000S wide-diaphragm condensers (on hypercardiod) to spot the violin and cello. At first I was contemplating putting a spot (perhaps SM57) on the bass strings of the piano, but I decided that it would sound unnatural, and anyway the bass level of the grand piano sounded decent from my listening point. Frequency response was set to full (no filters) as I could filter what I needed later on.

The problem of aquiring a stereo bar was solved by my trombone teacher lending his stereo bar to me.

All this would be put through a Soundcraft Spirit Studio 16 track analogue mixer (I really needed preamps, but we didn’t have any suited for the job) into a M-Audio Delta 1010 Soundcard on a computer in a seperate control room. It would be recorded on to Cubase SX 2.01 .

I was originally planning to put some acoustic foam behind the piano on the wall, but later on we discovered that the trio was being filmed as well, and as the foam would look ugly, that idea had to be scraped.

Recording day arrived, and it took me about 1 1/2 to set up the equipment. The main stereo pair ended up about 3/4 metres away from the trio about 3 metres up, with spots coming in from behind the player’s shoulders, about a metre away from their instruments. The piano was dragged as far as it could be from the wall (which was about 30cm!) and was put on half-lid.

Timing for recording was timed around the school bell ringing, which made life a bit tough, but we got through the 1st movement without too much hassle. The 2nd and 3rd movements had to be redone (the trio was unsatisfied with their performance). Indeed, the high noise floor and sound leakage caused MAJOR problems in movement 4 when suddenly a police car zoomed by, it’s siren being picked up by the sensitive stereo pair. Unfortunately, we didn’t have time to redo it, so it remained.

Draft processing, mixing, and mastering was complete by the next day (done on Yamaha MSP5 near-field stereo monitors). Considering the lack of equipment and the state of the venue, initial results were decent. The stereo field was quite wide, and the sound coming from the stereo pair was such that only a bit of spots were added on, for definition. The excellent AKG 414s did their job well, as no equalization was applied. Of course, the control room couldn’t have worse acoustics, so I might be mistaken about that. Some problems included traffic rumbling here and there, the police siren, and the mid-lows were slightly muddy (probably because of the acoustics).

For a first time ambient project, I think things went quite well, and has been quite an experience. Just be sure to set up your ORTF properly and try different positions in the room to get a good sound.

Useful sources

Liszt Piano Sonata in B minor – Introduction

Well known for it’s great virtuostic sections, how about its unique structure? Also it’s contrasts and it’s musicality

Franz Liszt (1811 – 1886), well known to the world as one who portrayed the ‘devil’, shows much struggle of character within his pieces. An accomplished piano virtuoso, many of his pieces require much technical skill to be played. Don’t forget about the music which lies underneath this show-work, though.

His Piano Sonata in B minor is something special. Normally Piano Sonatas come in the form of 3 movements (sometimes 4), different in character. Here, Liszt has decided to roll up everything into a half-hour long 1 movement piece. One can’t get bored listening to it, though.

His piece shows great struggle between two opposite characters, one angry, and the other calm. A bit like Schumann’s “Florestan” and “Eusebius”, I guess. So, excitement, tension, resolve is very much a part of this piece.

The piece may be divided up into a few sections (Opinions differ, but I would say 4 sections). The piece may be looked at as a fusion of the sonata form and 4 movements. The sonata form consists of – 1st theme – bridge – 2nd theme – codetta – development – 1st theme – bridge – 2nd theme (in tonic) – coda.

In this particular work, Liszt reveals the 1st theme and the bridge, both fast and virtuostic, and moving on through a slowing bridge before coming to what you could call BOTH the 2nd theme, and also the 2nd movement. In fact, it looks like the 2nd theme is a variation of the 1st theme.

Later, Liszt moves into a ‘development’-like section, before a ‘scherzo-like’ section which turns back into our 1st theme (hence recapitulation), and also like the 3rd movement. The bridge and 2nd theme come back again, before moving into a coda (or somewhat like a 4th movement).

Frankly, I think Liszt was a genius at coming up with this work. It’s a sonata form, it’s a few movements in one, and may be called a work on variations.

And thus the end of the introduction to this piece, and the wonderful world of music.